

Mosaic tiles Mosaic tiles can give floors and walls a beautiful appearance, but over time, damage can occur. Whether it's cracks, loose chips, or discoloration, damaged mosaic tiles can significantly detract from the appearance of a room. Besides the aesthetic aspect, damaged mosaic tiles can also cause practical problems. Loose or cracked tiles can be dangerous, especially on floors where tripping is a risk. Moisture can accumulate in cracks, leading to further damage or even mold growth.
That's why it's important to replace damaged mosaic tiles promptly. In this article, we'll first discuss the causes of damaged mosaic tiles, followed by preparation and the correct procedure for removing and replacing them.
Causes of damaged mosaic tiles
There are several reasons why mosaic tiles become damaged. Wear and tear from daily use is a common factor, especially in areas like bathrooms and kitchens where moisture and temperature fluctuations affect the tiles. Impact damage, such as from dropping heavy objects, can also lead to cracked or chipped mosaic tiles. Another cause is poor installation. If mosaic tiles are not properly bonded or insufficient grout is used, they can loosen over time. An improper substrate can also contribute to the problem. Moisture that gets under the tiles, for example, from a leak, can weaken the adhesive and cause the tiles to shift or break.
Early detection of damaged mosaic tiles can prevent further problems. Look for small hairline cracks or slight movement of tiles, as this is often a sign of more extensive damage. By acting quickly, you can prevent the need to repair a larger area. You can also minimize future damage by ensuring a solid, waterproof substrate during installation and using high-quality tile adhesive and grout.
Preparation: What do you need to remove damaged mosaic tiles?

Before replacing damaged mosaic tiles, it's important to have the right materials and tools on hand. You'll need a hammer and chisel to carefully remove the damaged mosaic tiles. An adhesive remover will help clean off any old adhesive residue so the new tile adheres properly. You'll also need new mosaic tiles that match the existing tiles in color and size, as well as grout to neatly finish the new tiles after installation.
Safety is paramount when removing damaged mosaic tiles. Always wear protective gloves and goggles to prevent injury from flying tile fragments. Work carefully to avoid unnecessary damage to surrounding tiles. Use a chisel and hammer with care, and if the damaged mosaic tiles are firmly attached, it may be helpful to weaken the tile in a few spots with a drill before prying it loose.
Proper substrate preparation is essential for a long-lasting result. Ensure all old adhesive residue is removed and the surface is clean, dry, and smooth before installing new tiles. This prevents adhesion problems and ensures the new mosaic tiles stay firmly in place.
With the right approach, you can successfully remove and replace damaged mosaic tiles, making your floor or wall look like new again. In the next section, we'll discuss how to properly install and finish new mosaic tiles.
At Mozaïektegel.com, we offer mosaic tiles from renowned brands such as The Mosaic Factory, Stone Line, Stabigio, Terre d'Azur, Serenissima, DTG, JOS, Mapei, Vilar Albaro, Differenz, Ragno, Coba, Colorker, Atlas Concorde, and Beste Koop. Our selection includes wall tiles, floor tiles, tile stickers , and processing materials. , all top quality for your project. We also collaborate with proud partners such as Door Hardware Expert , Van Boxtel Interior Construction, Tegen de Wand, MuurWerken, Whiteboard-expert.nl, geWOONSTIJL, LIONSHOME and Wecho, so that we can provide you with complete solutions.
Step-by-step: Removing damaged mosaic tiles
Removing damaged mosaic tiles requires precision, especially if you want to keep the surrounding tiles intact. There are several methods for doing this safely.
Method 1: Manual Removal with Chisel and Hammer
For precise removal, a chisel and hammer are an effective method. Start by gently tapping the damaged mosaic tiles with the hammer to loosen them more easily. Then, place the chisel in one of the joints and gently tap it to loosen the tile piece by piece. Work slowly and systematically to avoid damaging surrounding tiles.
Method 2: Using a multi-tool or tile saw
If the tiles are firmly attached, a multi-tool with a grout saw attachment or a tile saw can help. Carefully cut along the joints of the damaged mosaic tiles to loosen them without damaging the adjacent tiles. This works particularly well with smaller mosaic pieces that are difficult to remove by hand.
Cleaning and preparing the surface
After removing the damaged mosaic tiles, it's essential to thoroughly clean the surface. Remove all adhesive and grout residue with a putty knife or adhesive remover. Ensure the surface is completely flat and dust-free before installing new tiles.
Choosing Replacement Mosaic Tiles
Finding the exact same mosaic tiles can be a challenge, especially if they've been in place for years. Many people who encounter damaged mosaic tiles are faced with the problem that the original tiles are no longer available. This can be frustrating, especially if the tiles are from an older series or are no longer produced. Fortunately, there are several approaches you can try to find a suitable replacement without it being visually noticeable that anything has been replaced.
The first step is to contact the original supplier or the hardware store where the tiles originally came from. Sometimes, it turns out that there's still a limited supply of the tiles in question. This is especially true for popular tiles that were sold in large numbers. If this isn't the case and the tiles are no longer available, it's time to look for alternatives. Searching for a similar color and pattern can quickly result in a perfect match, but if that doesn't work, you can still find creative solutions.
When partially replacing damaged mosaic tiles, it's important to match the color and pattern of the replacement tiles to the existing mosaic tiles. It's often helpful to look for tiles that are as close as possible to the original tiles in terms of shade and finish. Even slight color differences can be noticeable, so it's important to work carefully.
One helpful technique is to first place the replacement tiles in the room without gluing them down, so you can see how they relate to the rest of the mosaic. Sometimes it's helpful to strategically place tiles with a slightly different shade. This can be done by placing the new tiles in less conspicuous areas, or by creating a gradual transition between the old and new tiles, making the difference less noticeable.
If you can't find an exact matching tile, consider incorporating the replacement tiles creatively. A popular solution is creating a contrasting design, such as an accent mosaic. This can be an artistic and playful way to integrate the replacement mosaic tiles into the space without obscuring them. For example, you could create a pattern or image that interestingly combines the new tiles with the existing mosaic tiles. This kind of design solution can ensure that the repair is not only functional but also visually appealing.
If the difference between the new and old tiles is too great to be subtle, a more substantial intervention might be a solution. Replacing an entire section of the mosaic floor can make the transition less disruptive. By choosing a completely new mosaic style for a specific area of the room, you create a design that is not only visually appealing but also serves as a statement. This can even be an opportunity to refresh or upgrade the room's design, which offers an added benefit when replacing damaged mosaic tiles.
Adhesive and bonding techniques for mosaic tiles
Correctly installing and replacing damaged mosaic tiles begins with the right adhesive and bonding techniques. The choice of adhesive depends on the substrate and the environment in which the mosaic tiles will be installed. For damp areas such as bathrooms and kitchens, a waterproof tile adhesive is essential to prevent delamination. On dry substrates, a cement-based adhesive may be sufficient, provided it is applied correctly.
Evenly distributing the adhesive is crucial for a strong bond. To achieve this, spread the adhesive evenly with a notched trowel, ensuring each mosaic tile is securely in place. Too much or too little adhesive can cause problems, such as tiles shifting or lacking grip. Ensure the mosaic tiles are level with the surrounding tiles and press them firmly together for a perfect fit.
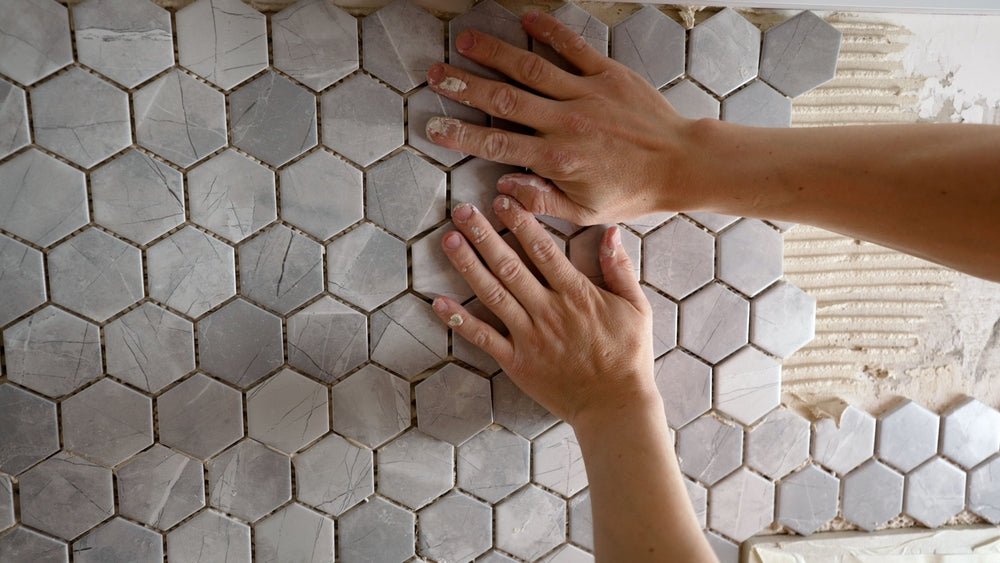
Adding replacement mosaic tiles
After installing the mosaic tiles, grouting is the next important step. For partial replacements, it's essential to choose a grout color that matches the existing grout. This prevents visual inconsistencies. If the old grout is discolored, it may be wise to re-grout the entire surface. Various types of grout are available, such as cement-based or epoxy grout. Epoxy grout is more durable and more resistant to dirt and moisture, while cement-based grout is easier to apply. Apply the grout with a rubber trowel, pressing it firmly between the joints. Remove excess grout immediately with a damp sponge, after which the grout is allowed to cure.
Drying time and aftercare after replacing damaged mosaic tiles
After replacing damaged mosaic tiles, drying time is an important aspect to consider. Most tile adhesives require 24 hours to dry completely, while grout can take up to 72 hours to fully cure. During this period, it's important not to wet the surface or subject it to heavy loads. Once fully cured, it's advisable to clean the mosaic tiles regularly with mild detergents and a soft cloth. To prevent future damage to mosaic tiles, protective measures such as applying a sealer to the grout and tiles can help prevent moisture and dirt buildup.
Common Problems When Replacing Damaged Mosaic Tiles
When replacing damaged mosaic tiles, several problems can arise that affect the final result. One of the most common issues is that the new tiles don't adhere properly. This can be due to an insufficiently cleaned substrate, the use of unsuitable tile adhesive, or an adhesive layer that is too thick or too thin. If the tiles become loose after installation, it may be necessary to remove them again and thoroughly clean the substrate before applying a new layer of adhesive.
Another common problem is color differences between new and existing mosaic tiles. This can occur when the original tiles have faded over the years due to sunlight, cleaning products, or wear and tear. It's important to test how the new tiles look next to the old ones beforehand and, if necessary, consider alternatives, such as re-grouting the entire surface or treating the old tiles with a special cleaner to minimize color differences.
When removing damaged mosaic tiles, it's possible to accidentally damage surrounding tiles. This can happen if the tile adhesive is very strong or if the tiles are placed too close together. To prevent this, it's important to proceed carefully and use the correct tools, such as a multi-tool with a diamond blade or a tile chisel with a rubber mallet. If additional damage does occur, it may be necessary to replace a larger section of the mosaic to maintain a uniform appearance.
Grout that doesn't fit properly or dries unevenly is another common problem. This can happen if the grout isn't mixed properly or if the tiles weren't completely dry before applying the grout. It's important to grout carefully and remove excess grout immediately to ensure a smooth, even finish.
Finally, air bubbles or voids can form under the tiles if the adhesive isn't spread evenly or if the tiles aren't pressed down firmly enough. This can lead to loose tiles or breakage later on. Good gluing technique and sufficient pressure during installation will help prevent this. By working patiently and carefully, these common problems can be avoided, and the mosaic tiles will ensure a durable and aesthetically pleasing result.
Contact us today for free, personalized advice so we can help you choose the perfect tiles for your project. Our expert team at Mozaïektegel.com is ready to guide you and ensure a worry-free experience from start to finish.
Preventive maintenance to avoid damaged mosaic tiles

Preventing damaged mosaic tiles starts with proper maintenance and the right protective measures. Mosaic tiles are often small and sensitive to impact, making them more susceptible to damage than larger tiles. By incorporating a few simple habits into your maintenance routine, you can significantly extend the life of your tiles and minimize damage from wear and tear or external influences.
One of the most important maintenance tasks is regular cleaning. Dirt, sand, and dust can act as abrasives and damage the glaze of mosaic tiles, leading to dull spots or scratches over time. Regularly sweeping or vacuuming the tiles and cleaning them with a soft mop and mild detergent will keep the surface in optimal condition.
Avoid harsh chemicals, especially on natural stone mosaic tiles, as these can damage the material and weaken the grout's bond. Grout plays a crucial role in protecting mosaic tiles. Damaged or worn grout can allow water and dirt to penetrate, leading to mold growth and loose tiles.
Check the grout regularly and repair small cracks or loose areas immediately with a specialized grout sealer. For added protection, applying a water-repellent sealer to the grout can help prevent moisture penetration, especially in damp areas like bathrooms and kitchens. In addition to cleaning and grout maintenance, it's wise to provide additional protection for vulnerable areas. On high-traffic floors, such as hallways and bathrooms, floor mats or rugs can help reduce wear and tear.
In kitchens where heavy pots and sharp objects are frequently used, using a cutting board and a protective backing can prevent damage to the tile surface. Temperature fluctuations are another problem with mosaic tiles, especially in outdoor areas or poorly ventilated bathrooms. Large temperature fluctuations can cause tiles and grout to expand and contract, which can lead to cracks or peeling over time. Ensure good ventilation in wet areas and avoid sudden temperature fluctuations by, for example, not pouring extremely hot water onto cold tiles.
For those who want to take mosaic tile protection a step further, a special coating or sealer can be used to protect the tiles against stains, moisture, and scratches. This is especially useful for porous materials like natural stone, which are naturally more susceptible to water and dirt. Regularly reapplying a sealer can help keep the tiles in top condition. By taking preventive maintenance seriously and regularly checking the condition of the mosaic tiles, damage can be minimized. This not only saves time and money on repairs but also ensures that the mosaic surface remains beautiful and well-maintained for years to come.
Alternative solutions if replacement is not an option
If replacement isn't an option, there are alternative solutions to repair damaged mosaic tiles. Small cracks or chips can be filled with special tile repair kits or epoxy resin. Another temporary solution is to repaint the mosaic tiles with special tile paint. This can create a uniform appearance, but it's not a permanent solution. If a mosaic floor or wall is structurally in poor condition, a complete renovation is sometimes the best option to prevent future problems.
Want to know more about damaged mosaic tiles? Our Our knowledge base offers comprehensive information, helpful tips, and valuable insights to help you choose mosaic tiles. Also check out our frequently asked questions. for quick answers to your questions.
Want to buy top-quality mosaic tiles?
Replacing damaged mosaic tiles doesn't have to be a complicated process if you follow the right steps. By carefully selecting the right tiles, gluing them correctly, and grouting them properly, you can ensure a seamless finish. Common mistakes, such as poor adhesion or color variations, can easily be avoided with the right preparation and materials. This guide provides you with all the information you need to effectively remove and replace damaged mosaic tiles, so your floor or wall looks as good as new.
At Mozaïktegel , we offer business customers the opportunity to register for free and benefit from exclusive discounts, extra service, and the fastest delivery. We're ready to serve you with a wide range of high-quality products. You can also order samples for almost our entire tile range. , so you can always be sure you are making the right choice.
Would you like to see our tiles in real life first? Then visit our Our showroom in Volkel, where you can admire a wide selection and find inspiration for your business project, is open Monday through Friday from 8:00 AM to 8:00 PM and Saturday from 9:00 AM to 3:30 PM. Contact us for more information or free personalized advice!


